|
In the April edition of Sea Angling News, I included a photo of a
Prawn lure I tied which has raised quite a lot of interest amongst salt
water fly fishers. I would like to pass on the credit for this pattern to
my regular salt water fly fishing pal Russ Symons, the highly regarded Sea
Angling and Fly Fishing photo journalist.
During a
recent visit, Russ showed me a couple of salt water shrimp and prawn
patterns. On my return home I got to thinking about how I might tie
something similar myself and as ever, try to personalize the design to my
own preferences from various materials which I had to hand.
Here’s my version.

- Your first task is to make the eyes on stalks.
These need to be made a few days in advance. I usually make a batch of 30
or 40 at a sitting and store them for subsequent use on a number of other
patterns including crabs. They don’t take long. It can be a pleasant way
to while away an hour on a damp afternoon.
Take a length of clear 60 lb b.s. monofilament fishing line. About 4
inches is ideal. Heat the end in a flame from a gas cigarette lighter or
long wooden match. I use a gas powered plumber’s blowlamp on a very low
setting. As the end starts to melt, keep turning the piece of mono
allowing a ball to form. Do mind your own hands and fingers molten nylon
sticks to the skin and can prove quite painful; I speak from bitter
experience!
I push the sharp end of the mono into a block of polyurethane foam to hold
it while the molten eyeball sets.
After it has cooled I dip the ball into black coloured nail varnish then
reinsert it into the foam block for a few days until the varnish has
completely hardened. I sometimes add a second coat of transparent “Sally
Hansen – Hard as Nails with Nylon” over the top of the cured black varnish
and then leave the eyes to harden for a few more days. This makes them
very durable and adds depth to their appearance.
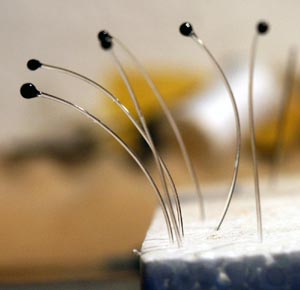 |
Eyes made from
60 lb b.s. mono
with varnish
drying |
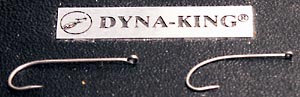
- Your next choice involves the style of hook you
prefer. I normally use a size 2 which appears about right for this
design. You may prefer to go larger or smaller as your fancy takes you.
Salt water is highly corrosive, so a stainless or rust resistant finish to
the metal is a must. For a heavier quick sinking pattern I use a
Stainless Steel Saltwater Aberdeen pattern hook, model ref: SW039SS by
Partridge. If you can’t get this, (and they are readily obtainable from
any reputable fly fishing material supplier), then use a stainless
“O’Shaughnessy” pattern which you can buy at any sea angling shop, but do
ensure the point is needle sharp. You can improve it with a diamond hook
lap file if you wish.
More recently I discovered a purpose made Partridge Saltwater Shrimp Fly
hook; Partridge Ref: CS54, which has a corrosion resistant “NIFLOR”
finish. It also has a slightly curved shank and a wider gape than the
standard Aberdeen pattern. This is now my preferred choice.
Hook Types
Partridge Stainless Aberdeen (l)
Partridge Saltwater Shrimp Fly (r) |
 |
- I use a heavy thread for the under-body of my salt
water flies. Big Fly u-w “B” thread, which is about 3/0 weight, is
perfect. I have used white in this example, but you may choose another
colour. The heavier thread covers the hook more quickly and thickly to
build a tapered body shape.
Even layers can best be achieved when winding this thread onto the shank
of the hook if you spin the bobbin holder anticlockwise every 6 – 10
turns. This unwinds the twist in the yarn and allows it to lay flatter
and consequently build a neater body.
- I usually insert the hook into my fly tying vice and
then lightly coat the shank with superglue, from just behind the eye to a
point at the start of the bend of the hook opposite the barb. I then wind
the thread onto the hook from just behind the eye down to the start of the
bend and back, building up a tapered body shape as I do so. About 4 – 6
layers is about right.
You will have probably already noticed that this fly is tied back to
front. The head and eyes of the fly are above the bend of the hook, while
the tail of the shrimp covers the eye.
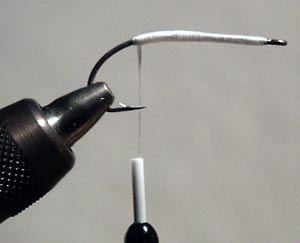 |
Layered thread
on hook shank
forming body
shape |
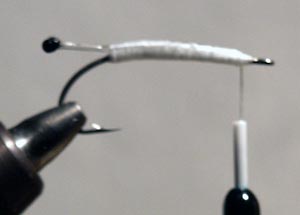
- Take the thread to the head end of the fly, above
the hook bend. Take a pair of the mono eyes which you made earlier and
scrape the lower two thirds of their stalks with a sharp blade to roughen
and slightly taper the surface furthest away from the ball head. This
makes them far easier to attach as it keys the surface of the nylon and
lets the thread grab it more easily.
Whip the pair of eyes to the top of the hook shank so they protrude just
forward of the hook bend. Take the thread back to just behind the hook
eye in close turns. Now splay the eyes slightly by bending them outwards
in your fingers.
Eyes tied in
on body &
thread whipped
back to just
behind eye
of hook |
 |
- Select a bunch of “Bestway Super Hair” or some
similar crinkly filamentous material about 3 inches long. Use this to
form a tail; thicken the back of the body; and make sub whiskers at the
head of the prawn, by whipping it onto the shank of the hook from the tail
towards the head. Splay the tail over the hook eye and then trim it to
length. Now look at the whiskers at the head end and trim them off to
your preferred profile. The whipping thread should be at the head end of
the body at this stage.
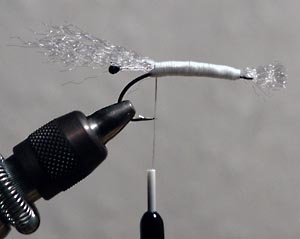 |
Bestway
"Super Hair"
tied in on top
of hook shank
forming sub-whiskers
at head; thickened
body profile;
and fan tail |
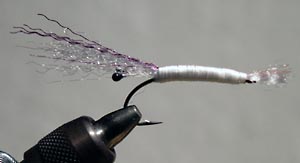
- Now if you want to make your Prawn look even better,
select about 6 strands of “Firefly Hot Tail” brightly coloured crinkly
nylon. In the photograph, I have used a shade which graduates from purple
(at the head end) to pink (over the body and tail). You can obtain other
colours including green and orange which are also suitable.
Lay these strands on top of the back of your fly and lightly whip them in
touching turns back to the tail. Secure your tying thread with a couple
of half hitches at the tail, just behind the eye of the hook. Trim the
over layers at the head and tail to your preferred profile.
Firefly
"Hot Tail"
fibres tied
in to form
thicker head
& tail whiskers |
 |
- Personally from this point on, I tie off and cut the
heavy tying thread and change to a far lighter thread as I have finished
building the bulk of the Prawn’s body.
I whip on the lighter thread just at the head end of the Prawn. I’m going
to use it to secure a long feather hackle which will eventually be
palmered along the finished body, tied off at the tail and clipped to form
legs.
- Take a “grizzle” (brown & creamy white) cock hackle
feather about 3 or 4 inches long. Tear off the fluffy fibres at the base
of the feather leaving the central quill protruding.
Whip this exposed quill to the underside of the hook shank and then take
the lighter thread in open turns along the body, back to a point at the
tail, just behind the eye of the hook. Leave the whipping thread bobbin
dangling at this point.
- Take a length of pearl mylar tinsel and secure it by
tying its end with the whipping thread just behind the eye of the hook.
This tinsel is going to give the Prawn its translucent appearance.
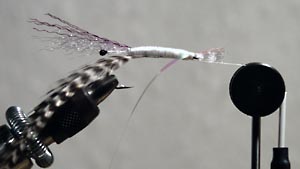 |
Grizzle cock
hackle tied in
at head
&
Pearl Mylar
tinsel tied in
at tail |
- Now coat the surface of the thread body of the prawn
with super glue. Don’t get it on your fingers! Wind the pearl mylar
tinsel over the tacky superglue, forward to the head and then back over
itself to the tail in close turns. Use the whipping thread to tie off the
end of the mylar tinsel at the tail, just behind the eye of the hook.
Pearl
Mylar
tinsel wrapped
over thread
body to head
& back to the
tail, then tied
off at tail |
 |
- Next grip the tip of the grizzle cock feather hackle
and wind it in 4 or 5 quite widely spaced even turns over the mylar,
around the body back to the tail where you tie it off with the whipping
thread, just behind the eye of the hook.
You can now whip finish the tying thread just in front of the eye of the
hook and then neatly cut the thread. I often use a dubbing needle to
apply a dab of superglue to the final whipping of the thread to keep it
secure.
 |
Grizzle cock
hackle wound
over mylar tinsel
body, "Palmer"
style, back to
just in front of
eye of hook,
then tied off
at the tail |
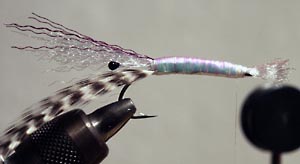
- Now take your fine scissors and trim off the
individual feather fibres from the central quill along the back and sides
of your Prawn. Just leave the fibres below the belly of the Prawn to form
its legs.
Hackle fibres
on back & sides
of body trimmed off
to leave fibres
below belly as
legs of Prawn |
 |
- I like to take a spirit based indelible black felt
tip marker pen and draw lines on the Mylar, across the back of the Prawn,
which simulate the joints in the transparent shell.
- You now have two choices to create the outer shell.
You can finish the back of the Prawn by coating it with 5 minute Epoxy
glue.
I prefer to use a transparent hot glue stick in an electric hot glue gun
to form the shell back of my Prawn. I finder it quicker, easier and far
less messy.
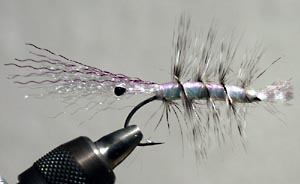
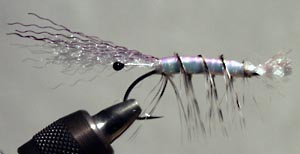
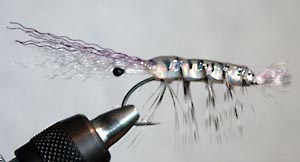 |
Finished
Salt Water
Prawn Fly
Lure |
You need to pick your spot and tide and use your Prawn to catch Bass,
Pollack, Wrasse, Mackerel, and Scad.
My pal, Colin Werlock tried the prototype on a normal
fishing rod under a float and caught three nice Pollack each of about 2 lbs
in weight from a local breakwater. He was really peeved when he lost his
“Prawn” amongst the rocks, just as he was getting to like it!
I know it will work well with my new Sage RPLXi 9 foot
#8 weight fly rod; Snowbee XS large arbour reel; floating, intermediate, or
sinking fly line depending at what depth the fish are feeding; and about 2
to 3 metres of 10 lb b.s. fluorocarbon leader material.
I didn't get around to salt water fly fishing during
the 2002 season, I guess the fishing was so good I didn't make time that
year. During the late summer of 2001 Patsy & I caught more than 200
fish on a fly rod fished close inshore from our own small boat. It
really did provide some exciting sport and entertainment.
I anticipate catching
some nice fish on salt water fly in local waters during those quiet early
mornings and warm summer evenings in 2003.

Here are the contact
details for some useful suppliers of Fly tying & fly fishing equipment:-
SportFish Ltd, Winforton,
Nr. Hereford, HR3 6SP, for Rods; Reels; Fly Lines; Accessories; Clothing;
Fly Tying items; 01544 327111 or
www.sportfish.co.uk
Sportfish also have
several stores throughout the U.K. including their lakeside venue at
Haywards Farm, Theale, Reading, RG7 4AS, Tel: 0118 9303860.
Snowbee Ltd, Drakes
Court, Plympton, Nr. Plymouth, Devon, for Rods; Reels; Fly Lines;
Accessories; Clothing; Fly Tying items; Tel: 01752 334933 or
www.snowbee.co.uk
Lakeland Flytying, 9 Devonshire Street,
Dalton-in-Furness, Cumbria, A15 8SW, for Fly Tying items; Tel/Fax: 01229
465753 or
www.lakesflyfishing.co.uk
"Firefly", 2 Southam
Road, Dunchurch, Warwickshire, CV22 6NL
Tel: 01788 815855
|