fishing Dartmouth sea angling Devon uk charter boat shore plaice turbot bass river dart |
||||||||||||||||
SERVICING LEVER DRAG SPOOL,
CLUTCH & BEARINGS |
||||||||||||||||
|
Ah! Ha! You say. "I've looked at your articles on
servicing my multiplier reels myself, but I have a reel with a lever drag
and it looks nothing like the inside of a star drag model.". Fear not.
They are a little different, but quite easy to deal with. All our previous tips on listing the order of assembly; photographing the bits, or sketching their position as you strip it down; keeping the components safe; cleaning checking and lubricating bearings are just the same. Remember that bearings are designed and intended to deal with rotational strains. However, in LD reels, tightening up the clutch by pushing the lever into the maximum drag position also imposes a sideways "crushing" load on the end plate bearings, which were never designed to withstand that, As a consequence, the main bearing inside the side plate at the end where the handle is located bears extreme pressure for which it was never designed. If your reel has become "graunchy", it is often because this particular bearing has been damaged.
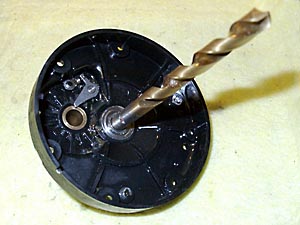
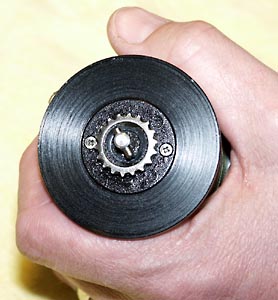
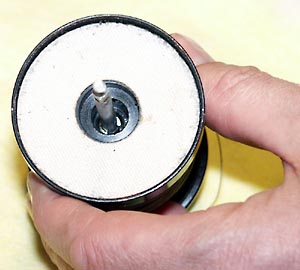
We've already explained how to remove this bearing in an earlier tip, by inserting the smooth end of an appropriately sized drill and gently rocking the bearing to ease it out from its seat. We also told you how to clean and inspect it. You will also already know how to lubricate a bearing from those previous articles. Ok! Back to the plot! Let's look at the spool, which contains the clutch plate and its own set of bearings, threaded on the main spindle. Let's stick with a "Shimano" lever drag reel as our example. Abu reels are very similar in principal. All lever drag reels are constructed along similar lines. You can visit Shimano on line at www.shimanofelindre.co.uk to see exploded diagrams of their lever drag reels & order spare parts, or you can call them on 01792 796584. Abu service are a division of Pure Fishing UK Ltd. and can be contacted on 0845 0500093. If you own one of the very sophisticated "Boss Accurate" American big game reels, then a visit to their web site www.accuratefishing.com where you can even download an animated instructional video free of charge, describing how to service any of their twin drag reels, is a worthwhile task. Their spares are all listed on-line, together with the prices per component. Paul Bright at Reel Value www.reelvalue.co.uk 07946 733181 stocks ceramic or stainless steel bearings for most makes and models of multiplier reels. Of course, if you kept the parts list which came in the box with your newly purchased reel, all of this will be made far simpler. So, you've removed the end cap from your reel. You've unscrewed the knob on the top of the lever drag and undone any "circlip" that may be evident in some makes, at the end of the spindle. You will have in your hand a spool, with a spindle through its central axis, and are probably thinking "What do I do next?" Pull yourself together! First of all, you've got to remove the end cap sited at one end of the spool. On the Shimano LD series, it is clearly marked "Unscrew" with a large arrow showing the direction in which it unscrews. It is the opposite way to most screw threads. You grasp the spool and rotate the end cap CLOCKWISE to undo it.
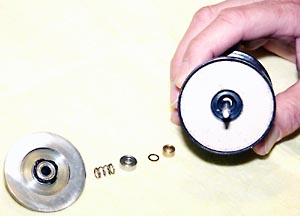
Later, when you come to replace it, you will screw it up ANTI-CLOCKWISE. That is the exact opposite of what you might have expected. You can now lift out the components at that end of the reel & carefully put them down safely in their correct order. Now move to the opposite end of the spool and remove the cross pin. Be careful not to lose this piece. It can easily fall out of the spindle. Next remove the two small screws which hold the click gear and its mounting plate.
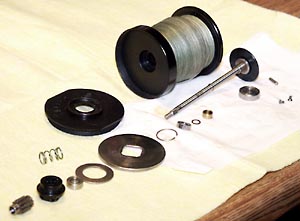
Now, lay all your parts out safely and in order, so you can easily identify them for reassembly after service.
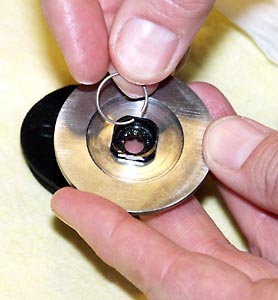
That wasn't so bad was it. Now is the time to clean off each of the components. Lightly grease washers and the central spindle. Clean and lubricate all bearings as we have previously shown you. When you have done that you can commence reassembly, which is pretty much a reverse order of the strip down sequence. Starting from the bottom end of the spool and spindle, let's thread on the two cupped spacer washers which are slipped onto the spindle edge to edge, so they can be minutely compressed when you tighten the drag in use. Next slip on the ball bearing race. Now you can slip the shaft straight through the centre of the spool and fix the assembly by replacing the two small screws through the click gear mounting plate into the end of the spool. I don't put the cross pin back through the spindle until I am finally ready to insert it into the body of the reel on final reassembly. It's easy for it to drop out and be lost. Now let's look at the opposite end of the spool assembly, the end where the clutch friction plate and end cap are located. Here the parts are reassembled in the following order. First we will reassemble the pinion guard (into which you will eventually slip the pinion gear) by slipping it through the pre-load spring washer which sits (cupped side uppermost) on top of the smooth outside face of the flat metal drag plate.
We then will fit a spring "circlip" to secure the whole assembly together on the underside of the flat metal drag plate, in a groove around the base of the pinion guard. Be careful not to stick the sharp end of this wire "circlip" into your finger or thumb!
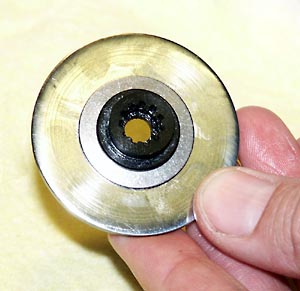
Now is the time to slip the cleaned bearing back into the bearing housing inside the base of the pinion gear housing. If the clutch friction fabric washer is a little discoloured on its upper surface, simply turn it over to expose a clean upper side and you will double its effective life.
Now lets reinsert the various bushes, washers and bearings onto the spindle at this clutch plate end of the spool assembly.
First insert the brass bush by slipping it on the spindle. Next we slip on the small thin copper shim washer, followed by another ball bearing. Next it's that wire spring to go onto the spindle. Be careful it doesn't escape when you start to compress it! Slide on the re-built pinion guard, spring washer, drag plate and bearing assembly. Next fit the screw-in end cap back onto the main spool to hold all the components in place. Remember it screws in ANTI-CLOCKWISE. Lightly grease the pinion gear and slip it onto the shaft and into its housing where it locates with its machined splines. Don't forget to lightly grease the cross pin and replace it through the spindle at the opposite end of the spool. Now all that is left to do is to pop the freshly serviced spool, spindle and clutch assembly back into the reel body cage. Ensure the pinion gear goes into the centre of the end plate bearing. Gently tighten down the end plate by replacing the screws which secure it in place. See our later tip about tightening those screws in a diagonal sequence. Do not over tighten them, you will strip their threads. Finally, use a finger to press the spool upwards into the end plate at the handle end of the reel, while you replace the lever drag assembly. You should replace the lever drag components with the lever in the free spool position, which exerts the minimum pressure during the re-build. Then all you have to do is adjust its tension to suit. Hey remember what we told you. Don't over tighten it, or you will crush that ball race. Job done. (c) Mike Concannon 14th March 2004 - with grateful thanks to Paul Bright, Reel Value, for his advice and assistance. |